Access Features Part 1 documented the decisions for the lift into the bus and also the kitchen area. Part 2 looks at the Work Table, power outlets, and toilet. There will be a separate post on my mobility equipment, seating, as well as changing the sheets without climbing on the bed.
Access note: I belatedly realized I haven't described the images. Starting with this post (and all other posts will follow) I am adding a detailed caption to each image. Apologies to folks for not doing this sooner.
A quick summary - I am a wheelchair user. I need to do (or know how to direct someone else to do) everything on the bus - from hooking up at campsites to changing the bed by myself. Posting the layout again.
WORK TABLE / DESK
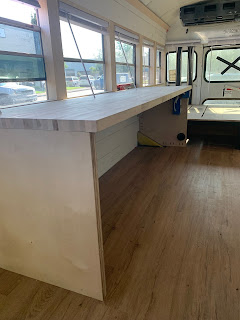
I plan to do a lot of writing and making art. I want a durable surface with lots of room to spread out a project. I choose a single slab of maple butcher block 8' long and 2' deep as the top of the work table. I find that 2' depth is the right mix for me of work and tabletop storage area.
Inside the bus I get around in an office chair on wheels. It has a smaller footprint than a wheelchair. I designed a table that is an upside down "U". The side supports are solid plywood so they can be used as attachment points to restrain the under-desk storage.
Under both the kitchen and work tables the space is wide open
from side support to side support. This design gives me maximum
flexibility in storage and the easiest options for changing systems as
my needs change. My current plan is to use the 3 gallon and 10 gallon
Rubbermaid totes because they are light to lift, are rubber so no noise
when rolling down the road, and stack easily allowing for many different
configurations.
 | |
| Photo of desk/table |
As you can see on the far right side the yellow metal is the cover for the gas tank. The blue electrical outlets show (from top) ceiling light control (so I can turn the lights on/off from bed), two 3 prong plugs and below that two USB plugs. The black circle at the bottom of the right leg is where the heat comes in from the diesel heater.
 | |
| Close up photo of right table support showing (from top) light switch rocker, two 3 prong outlets, two USB outlets and at the bottom the heater vent. |
POWER OUTLETS
I placed power outlets in strategic places throughout the bus. They are under the front edge of the kitchen and desk counters. When they are on walls, they are just below the windows at a height of 24" from the ground.
The under-counter outlets are recessed 4" from the front edge of the counter. This allows the plug to stay tucked inside the profile of the countertop. I didn't want to be hitting a plug because it was sticking out from the edge of the countertop.
A few things have their own power outlets - the washing machine, the Dometic fridge/freezer, the Superarm lift and the driver transfer seat. The electric hoist on the crane will also have a dedicated outlet.
The rest of the outlets have both 3 prong and USB plugs. Having many USB ports means that I don't have to constantly look for USB adapters.
TOILET
** If you talk to RV folks you will hear about toilets. If you don't want the details, skip this section. **
There's
lots to think about in selecting an RV toilet. The biggest one is black
tank or not. A black tank is basically a holding tank where the toilet
empties. In an RV that means you fill it up and you then have to empty
it.
 |
| Photo of the Separett toilet from above. Also visible is the drain pipe for the sink. |
So I started exploring composting toilets. I knew I wanted a urine-diversion option. That means the urine is hooked up to the grey tank (waste water) and mixed with the water runoff from the sink and tub.
The final consideration is what happens to the poop. Some systems incinerate it but that's a huge energy hog and I want to have off-grid, low power options. Other systems require you to crank a handle to mix the poop with another substance (sawdust, coconut coir, etc).
I settled on the Separett toilet because the urine can go into the grey water tank and the poop decomposes slowly into a bag and can be easily emptied.
I had the toilet set 6" away from the wall to give me more space. I also have open space on both sides so that I have multiple options for transfer direction.


This is spectacular! I am so excited to be following along with your adventures, Corbett ❤️
ReplyDelete